Here is a step-by-step tutorial for making the granny-square diamond motif shown in your image. This square is made in four colors and uses traditional granny clusters (3 double crochets).
🌸 DIAMOND GRANNY SQUARE — VERY DETAILED TUTORIAL
Stitches Used
- ch – chain
- sl st – slip stitch
- dc – double crochet
- sp – space
- ch-2 corner – a chain-2 space that forms each corner
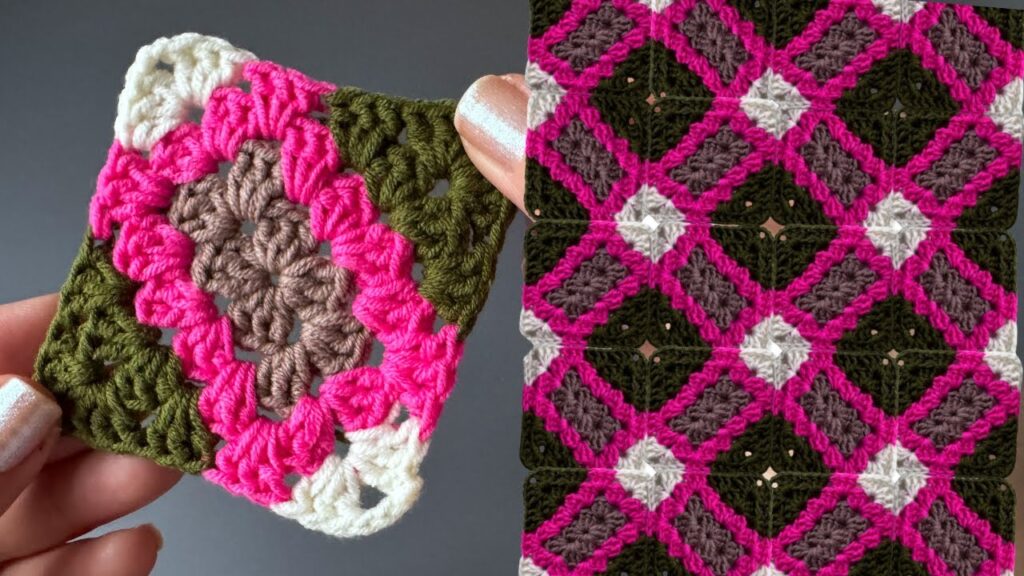
✅ ROUND 1 — Center (Brown)
This round makes a small 4-petal flower shape.
- Make a magic ring.
- Into the ring:
- ch 3 (counts as 1 dc)
- 2 dc → (first cluster)
- ch 2 → corner
- Repeat (3 dc, ch 2)3 more times.
- You should have 4 clusters separated by 4 chain-2 spaces.
- Pull the magic ring tight.
- Join with sl st to the top of the beginning ch 3.
➤ You now have a tiny square with 4 corners.

✅ ROUND 2 — Pink (Full Granny Round)
This round builds the first layer around the center.
- Attach pink yarn into any corner ch-2 space.
- Work (3 dc, ch 2, 3 dc) into that corner.
This is one full granny corner.
- Repeat in the next 3 corners:
- 3 dc, ch 2, 3 dc
- Join with sl st to first dc (or top of ch-3).
➤ You now have a normal granny square with 8 clusters (2 in each corner).

✅ ROUND 3 — Olive Green (Side Extension Round)
This round creates the long diamond shape.
- Attach olive yarn to any ch-2 corner.
- In the corner:
- 3 dc, ch 2, 3 dc
- Along each side:
- Work 3 dc into the space between 2 clusters from previous round.
(There is 1 space on each side in this square.)
- Work 3 dc into the space between 2 clusters from previous round.
Side layout per edge:
- Corner
- One 3-dc cluster in the middle of the side
- Corner
Repeat this for all 4 sides.
- Join with sl st to the first dc.
➤ After this round, the square is bigger, and the green forms the long diamond edges.

✅ ROUND 4 — White (Corners Only)
This round is special because it does NOT fill the sides, only the 4 corners.
This is what creates the white triangular tips you see.
- Attach white yarn into any corner space.
- Work (3 dc, ch 2, 3 dc).
- Skip the entire side (do NOT work in any spaces).
- Repeat in all 4 corners.
- Join with sl st.
➤ After this round:
- The square has sharp, pronounced corners
- The sides curve inward slightly — that’s normal
- When joined together, they form perfect diamonds
⭐ SHAPE EXPLANATION
- The brown makes the center.
- The pink makes the inner diamond.
- The olive makes the outer diamond body.
- The white makes sharp tips that interlock when joined.
💠 HOW TO JOIN SQUARES (Exactly like the right picture)
You join them during Round 4 (white), using Join-As-You-Go (JAYG).
While making the white corners:
For each new square:
- Crochet the first corner normally:
- 3 dc, ch 1
- Insert hook into the matching corner of the finished square, sl st.
- ch 1 to finish the corner.
- Work 3 dc to finish the corner.
For sides:
- There is one side gap per side, so join it with sl st into the side gap of the neighboring motif.
- Then continue the next corner.
This creates the pink-framed diamond grid seen in the blanket.