That’s a beautiful crochet 3D flower motif blanket pattern — featuring red petals with green centers! 🌺
Here’s a detailed step-by-step guide to help you make it:
🧶 MATERIALS
| Item | Details |
|---|---|
| Yarn | Red (petals), Green (center), Cream/Beige (background) – medium weight cotton or acrylic |
| Hook | 3.0 mm–3.5 mm |
| Tools | Scissors, yarn needle, stitch marker (optional) |
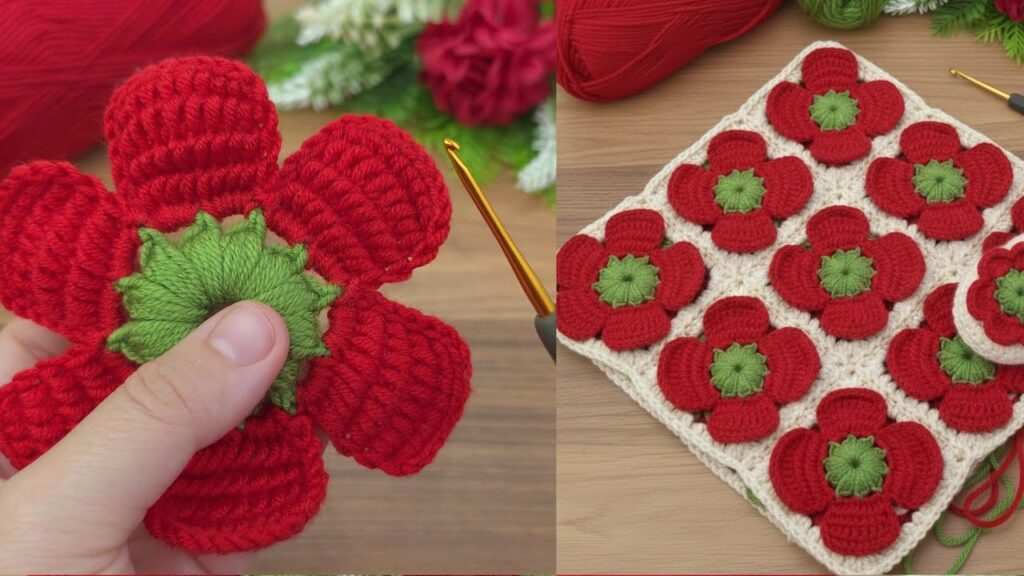
🌿 STEP 1: Crochet the Green Flower Center (Base)
This part will be the center of your flower and the base for the petals.
Round 1:
- Make a Magic Ring.
- Chain 1 (does not count as a stitch).
- Crochet 6 single crochets (sc) into the ring.
- Pull the ring tight and slip stitch (sl st) to the first sc to join.
→ (6 stitches total)
Round 2:
- Chain 1.
- Crochet 2 sc in each stitch around.
- Join with a sl st to the first sc.
→ (12 stitches total)
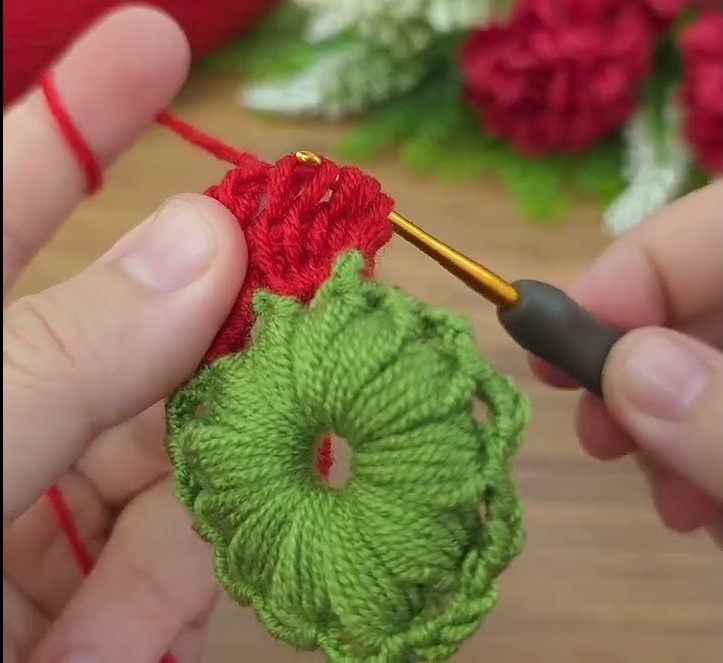
Round 3 (Leaf Points):
- Chain 3, then make 1 single crochet (sc) in the same stitch.
- Skip the next stitch, sl st into the next one.
- Repeat chain 3, sc in same stitch, skip 1, sl st next all the way around.
→ You’ll have 6 green “points” or spikes — this is where your red petals will attach later.
Fasten off the green yarn.

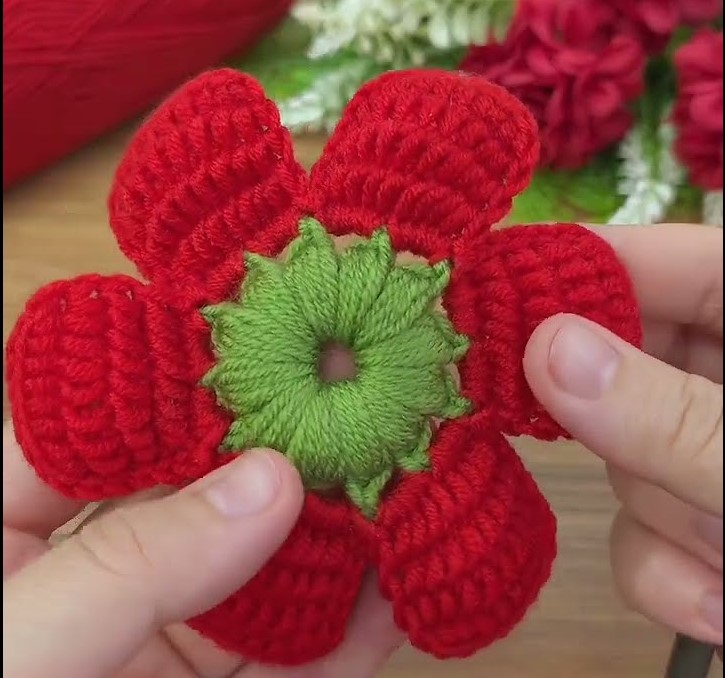
🌺 STEP 2: Make the Red Petals (3D Shape)
Attach your red yarn to any green spike tip.
For each petal:
- Chain 8.
- In the 2nd chain from hook: 1 single crochet (sc).
- In the next chain: 1 half double crochet (hdc).
- In the next 5 chains: 1 double crochet (dc) in each chain.
→ You now have one petal. - Slip stitch (sl st) into the next green spike to anchor the petal.
- Repeat steps 1–5 around the flower to create 6 petals in total.
When done, fasten off and weave in ends.
🧵 Tip: For more volume, you can crochet each petal in two layers:
- Work one row of dc up the chain,
- Then another row of dc down the same chain back to the base,
- Slip stitch to next point.
This gives the petals that thick, soft 3D look like in your picture.
🌸 STEP 3: Shaping the Flower
- Use your fingers to gently curl the petals outward.
- Make sure each petal overlaps slightly, giving a full, realistic flower look.
- You can block lightly with steam or water to hold shape.
🧩 STEP 4: Crochet the Beige Background Square
Now you’ll crochet around the flower to turn it into a square motif.
- Attach beige yarn to the back loop of any petal base (between petals).
- Chain 1, make 2 single crochets (sc) in that space.
- Work evenly around the flower base, about 3 sc on each petal side.
- At the corners, chain 2 (this will shape the corners).
- Continue around until you’ve formed a square shape.
- Slip stitch to join, and fasten off.
If you prefer a larger background, you can add a 2nd round:
- Chain 3 (counts as dc),
- 1 dc in each stitch,
- At corners: (2 dc, ch 2, 2 dc) in same corner space.
🪢 STEP 5: Joining Motifs
After making several flower squares:
- Line them up (right sides facing up).
- Use slip stitch join, mattress stitch, or join-as-you-go method with beige yarn.
- Continue until you’ve joined all flowers into your desired piece — blanket, bag, pillow, etc.
💡 OPTIONAL FINISHES:
- Add a border (1–3 rounds of double crochet) around the entire piece.
- Mix colors (different flower shades) for a garden effect.
- Add beads or buttons to the center if you like decoration.

