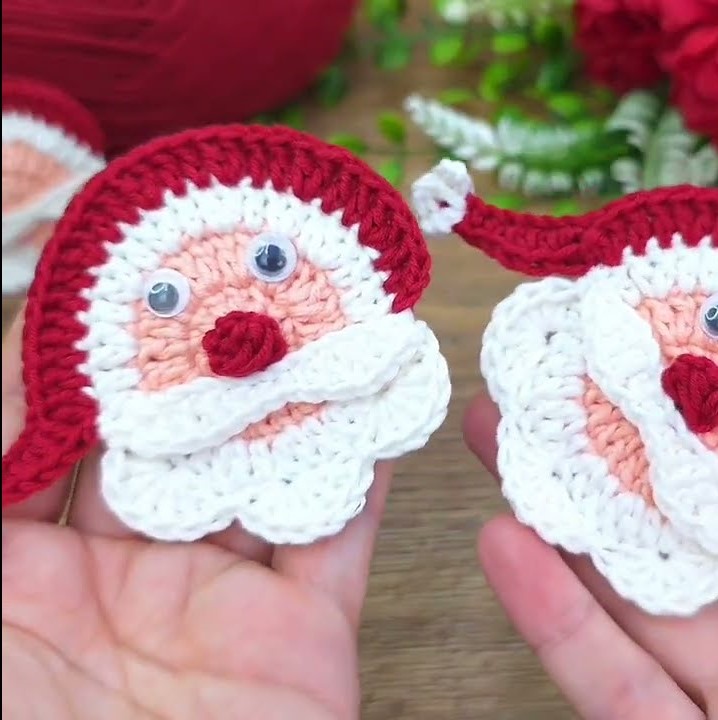
That’s a crocheted Santa Claus face applique, perfect for Christmas decorations, cards, or garlands! 🎅✨
Here’s a step-by-step tutorial on how to make it:
🎅 CROCHET SANTA FACE APPLIQUE — DETAILED TUTORIAL
🧶 Materials Needed
- Yarn:
- Skin color (peach or beige) — face
- White — beard and hat trim
- Red — hat and nose
- Hook: 2.5 mm or 3.0 mm
- Googly eyes or small black beads
- Yarn needle and scissors

🔹 ABBREVIATIONS (US terms):
- MR = Magic Ring
- ch = chain
- sc = single crochet
- hdc = half double crochet
- dc = double crochet
- sl st = slip stitch
- inc = increase (2 stitches in same stitch)
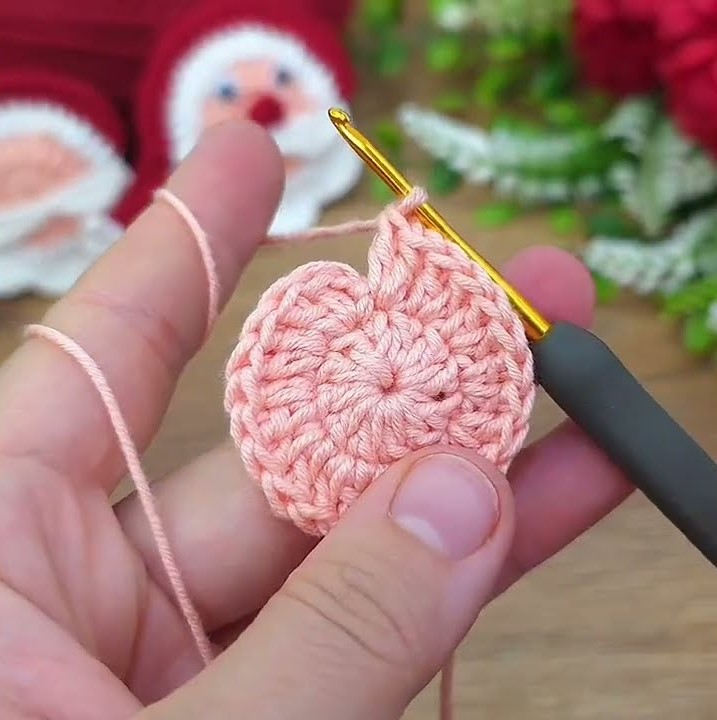
🧵 STEP 1: The Face (Peach Yarn)
- Start with MR.
- Round 1: ch 2 (counts as dc), make 11 dc into the ring (total 12 dc). Join with sl st.
- Round 2: ch 2, dc inc in each st around (2 dc in each st). Join. (24 dc)
- Fasten off and weave in the end.
💡 This is the peach-colored circle — Santa’s face.
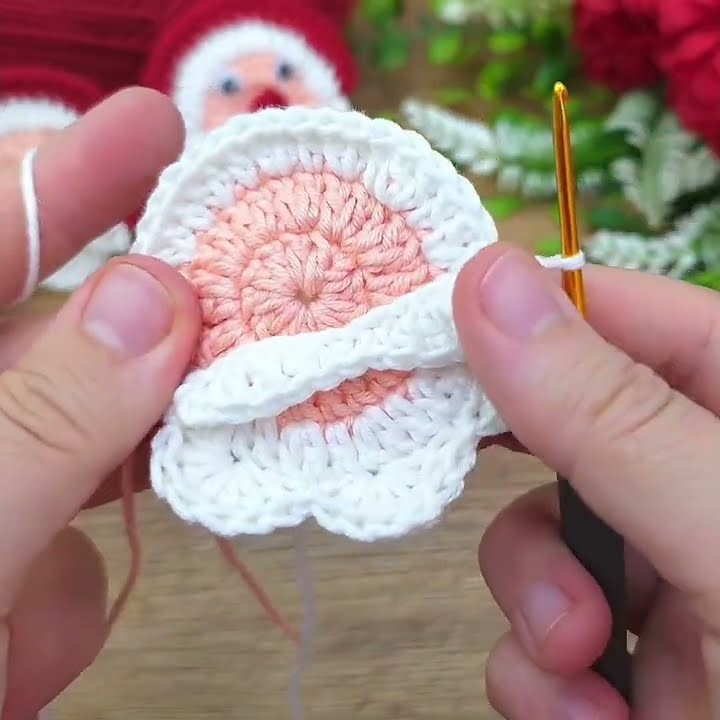
🧵 STEP 2: The Beard (White Yarn)
We will crochet across the lower half of the face.
- Attach white yarn to the side of the face (around the 4 o’clock position).
- Row 1:
- ch 1, sc in same st,
- hdc in next,
- (3 dc in next st, hdc in next, sc in next) repeat this wave pattern 5–6 times until you reach the opposite side (around 8 o’clock).
- Row 2 (optional for fuller beard):
- Turn, ch 1, work (sc, hdc, 2 dc, hdc, sc) across the previous row to make it fluffier.
Fasten off. The bottom should now have soft, wavy beard curves.
🧵 STEP 3: The Hat (Red Yarn)
- Attach red yarn to the top-right side of the face (around 1 o’clock).
- Row 1: ch 2, dc in next 6 sts across top edge (approx. half circle). Turn.
- Row 2: ch 2, dc2tog at start, dc in next 2, dc2tog at end (4 dc). Turn.
- Row 3: ch 2, dc2tog twice (2 dc). Turn.
- Row 4: ch 1, sc in first st, ch 12–15 for hat tail, sl st back into 2nd ch from hook, sc down chain for texture.
This forms the long curved hat tail.
🧵 STEP 4: Hat Trim (White Yarn)
To add the fluffy white trim:
- Attach white yarn along the bottom edge of the hat.
- Work 1 sc, 1 hdc, 1 dc, 1 hdc, 1 sc repeatedly to make a scalloped trim.
- Fasten off.
🧵 STEP 5: Nose (Red Yarn)
- With red yarn: make a small circle.
- MR, 6 sc in ring, join with sl st.
- Fasten off, leaving a long tail.
- Sew or glue the nose at the center of the face.
🧵 STEP 6: Eyes
- Glue googly eyes or sew on small black beads.
- Place them above the nose.
🧵 STEP 7: Pom-Pom on Hat
- With white yarn,
- Make a small puff: ch 2, 6 dc in first chain, join to form a circle.
- Or simply attach a tiny white pom-pom to the tip of the hat tail.
🎀 Optional Finishing:
- Outline the beard with slip stitches in white for extra texture.
- You can attach a hanging loop with chain stitches to turn it into a Christmas ornament.

