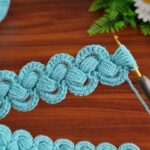
This is a crochet puff braid stitch pattern — a beautiful design often used for scarves, blankets, or decorative edges. I’ll explain step-by-step how you can make it:
🧶 Crochet Puff Braid Stitch — Full Detailed Tutorial
✨ What You Need:
- Yarn: Medium or light weight (like acrylic or cotton)
- Crochet hook: 3.5 mm – 4.0 mm (adjust for your yarn)
- Scissors
- Yarn needle (for weaving in ends)

🌼 Step 1: Make the Foundation Chain
You need a base chain that’s a multiple of 14 + 3 extra chains.
👉 Example: For 2 diamond shapes like your image, chain 31.
Chain 31:
(14 x 2) + 3 = 31
🌼 Step 2: First Row (Base of the design)
- Yarn over, insert your hook into the 4th chain from hook, make 1 double crochet (dc).
- Continue making 1 dc in each chain across the row.
- Turn your work.
This gives you a solid base to build your puff pattern.

🌼 Step 3: Second Row (Start the puff braid pattern)
Now we begin the special puff braid design.
- Chain 3 (counts as your first double crochet).
- In the next 5 stitches, make 1 puff stitch in each stitch.
How to make a puff stitch:
- Yarn over, insert your hook into the stitch, pull up a loop (3 loops on hook).
- Yarn over again, insert the hook, pull up another loop (5 loops).
- Repeat 3 times (you’ll have 7 loops).
- Yarn over and pull through all loops on hook.
- Chain 1 to close the puff.
Do this in 5 consecutive stitches.
- Skip 2 stitches, then make 1 double crochet (dc) in the next stitch.
- Chain 2, skip 2 stitches again, and make another dc in the next stitch.
→ This creates the “diamond center gap”. - Skip 2 more stitches.
- Make 5 puff stitches again, one in each of the next 5 stitches.
- Continue this sequence across the row.
🌼 Step 4: Third Row
You’ll now crochet over the gaps to build the braid shape.
- Chain 3 and turn.
- Work 1 dc into the same stitch.
- Chain 2, then 1 dc into the center of the previous puff fan.
- Between puff fans, you’ll now make the next row of puff stitches — but offset (start them between the gaps of the row below).
This staggered alignment creates the twisted braid look.
🌼 Step 5: Continue Rows
Keep repeating:
- One puff row
- One connecting row (with double crochets and chain spaces)
Each repeat adds another layer to the braid.
🌼 Step 6: Edge Finishing (Optional)
After your final puff row:
- Crochet 1 row of single crochets (sc) evenly across the top and bottom edges.
This makes the border neat and prevents curling.
🧵 Tips:
- Always keep your puff stitches even (same number of loops for each).
- Don’t pull the yarn too tight; keep your tension soft for a fluffy look.
- You can use two colors (e.g. pink and white) for a nice contrast in each row.